「ユーザーホームフォルダ」の版間の差分
| (同じ利用者による、間の28版が非表示) | |||
| 8行目: | 8行目: | ||
* <code>[homes]</code>はActive Directory (AD) ドメインコントローラ(DC)上での実行はサポートされていません。 | * <code>[homes]</code>はActive Directory (AD) ドメインコントローラ(DC)上での実行はサポートされていません。 | ||
以下では、ホームフォルダを含んでいるディレクトリは、共有名<code>users</code>を使用して共有されます。各ユーザーのホームディレクトリは、<code>\\server\users\''user_name''</code>のような感じで、<code>\\server\users\</code>共有のサブディレクトリとして作成されます。これはMicrosoft Windowsの環境で使われているのと同じフォーマットであり、追加の設定を要しません。 | |||
= Sambaファイルサーバーで共有を設定する = | |||
= | == WindowsのACLを使う == | ||
ホームディレクトリをホストする共有に、拡張アクセスコントロールリスト(ACL)を設定することは、手動でユーザーのホームフォルダを作成、アクセス許可を設定することなしに、<code>Active Directory ユーザーとコンピュータ</code>に新しいユーザーを作成することを可能にします。 | |||
Sambaファイルサーバー上でユーザーのホームフォルダーをホストするための共有を作成するには、たとえば<code>users</code>を使用します: | |||
* 新しい共有を作成してください。 詳細については、[[Windows ACLs を利用して共有を設定する]]を参照してください。 以下の権限を設定します: | |||
:* 共有の権限: | |||
:* | |||
::{| class="wikitable" | ::{| class="wikitable" | ||
!Principal | !Principal | ||
| 33行目: | 32行目: | ||
|} | |} | ||
:* | :* <code>users</code>共有のルートのファイルシステムのアクセス許可: | ||
::{| class="wikitable" | ::{| class="wikitable" | ||
| 53行目: | 52行目: | ||
|} | |} | ||
::<nowiki>*</nowiki> | :: <nowiki>*</nowiki> グループのメンバーがユーザーのプロファイルをその共有に格納することを可能にするために、別のグループを設定することもできます。異なるグループを使用する場合は、前の例の<code>Domain Users</code>に表示されているように権限を適用してください。 | ||
:: | :: 共有のルートで権限の継承が無効になっていることを確認します。[<code>セキュリティの詳細設定</code>]ウィンドウの許可エントリに<code>継承元</code>列にパスが表示されている場合は、[<code>継承を無効にする</code>]ボタンをクリックします。 Windows 7では、<code>このオブジェクトの親からの継承可能なアクセス許可を含める</code>チェックボックスをオフにして、同じ設定を設定します。 | ||
::[[Image:Home_Folder_File_System_ACLs.png]] | :: [[Image:Home_Folder_File_System_ACLs.png]] | ||
:: | :: Samba共有では、ファイルシステムACLの<code>SYSTEM</code>アカウントを省略できます。詳細は、[[The SYSTEM Account]]を参照してください。 | ||
これらの設定により、<code>Domain Admins</code>グループのメンバーは、<code>Active Directoryユーザーとコンピュータ</code>アプリケーションでユーザーのホームフォルダを設定できます。これにより、ホームフォルダが自動的に作成され、正しいアクセス許可が設定されます。 | |||
== POSIX ACLを使用する == | |||
Windowsのアクセス制御リスト(ACL)を使用する代わりに、SambaサーバーでPOSIX ACLを使用して共有を設定できます。 ただし、POSIX ACLを使用して権限を設定する場合は、新しいユーザーごとにホームディレクトリを手動で作成し、権限を設定する必要があります。 | |||
{{Imbox | {{Imbox | ||
| type = | | type = notice | ||
| text = | | style = margin: 4px 2%; | ||
| text = Samba Active Directory(AD)ドメインコントローラ(DC)で共有を設定するときは、POSIX ACLを使用できません。 Samba DCでは、拡張ACLを使用した共有のみがサポートされています。 詳細については、[[Windows ACLs を利用して共有を設定する#smb.confファイルで拡張ACLサポートを有効にする | smb.confファイルで拡張ACLサポートを有効にする]]を参照してください。 Samba AD DCで共有を設定するには、[[#WindowsのACLを使う | Sambaファイルサーバーでホームフォルダー共有を設定する - Windows ACLの使用]]を参照してください。 | |||
}} | }} | ||
たとえば、<code>users</code>共有を作成するには: | |||
* | * <code>smb.conf</code>ファイルに次の共有設定セクションを追加します: | ||
[users] | [users] | ||
| 84行目: | 82行目: | ||
force directory mode = 0700 | force directory mode = 0700 | ||
: | : 使用されるパラメータの詳細については、smb.conf(5) のマニュアルページの説明を参照してください。 | ||
: | : 共有の名前として<code>homes</code>を使用しないでください。 詳細については、[[#はじめに | はじめに]]を参照してください。 | ||
* | * ディレクトリを作成し、正しい権限を設定してください: | ||
# mkdir -p /srv/samba/users/ | # mkdir -p /srv/samba/users/ | ||
| 94行目: | 92行目: | ||
# chmod 2750 /srv/samba/users/ | # chmod 2750 /srv/samba/users/ | ||
: | : ドメインでは、<code> Domain Users </code>グループはグループで、すべてのドメインユーザーアカウントがそのメンバーです。 あるいは、ドメイン以外の環境を実行している場合は、ローカルに存在する任意のグループに設定できます。 ただし、共有にアクセスするには、ユーザーアカウントがこのグループのメンバーである必要があります。 | ||
* | * Sambaをリロード: | ||
# smbcontrol all reload-config | # smbcontrol all reload-config | ||
= 新しいユーザのホームフォルダを作成する = | |||
== Windows ACLを使用する == | |||
<code>Active Directoryユーザーとコンピュータ</code>アプリケーションを使用している場合は、ユーザーのホームディレクトリが自動的に作成され、アプリケーションでユーザーフォルダへのパスを設定すると正しいアクセス許可が適用されます。 <code> Active Directoryユーザーとコンピュータ</code>を使用していない場合は、フォルダを手動で作成して正しい権限を設定する必要があります。 例えば; | |||
* <code>\\server\users\</code>共有に新しいフォルダを作成する権限を持つアカウントを使用してWindowsマシンにログインします。 | |||
* <code>\\server\users\</code>共有に移動します。 | |||
* | |||
* | * ユーザーの新しいホームフォルダを作成します。 | ||
* | * フォルダのアクセス制御リスト(ACL)にユーザを追加し、そのユーザに<code>フルコントロール</code>を付与します。 詳細については、[[Windows ACLs を利用して共有を設定する#フォルダにACLを設定する |フォルダへのACLの設定]]を参照してください。 | ||
== POSIX ACLを使用する == | |||
POSIXアクセスコントロールリスト(ACL)を使用して<code>users</code>共有を設定するときは、新しいユーザーごとにホームフォルダを手動で作成する必要があります。 <code>demo</code>ユーザーのホームフォルダを作成するには: | |||
* ディレクトリを作成: | |||
* | |||
# mkdir /srv/samba/users/demo/ | # mkdir /srv/samba/users/demo/ | ||
* | * 次の権限を設定して、<code>demo</code>ユーザーのみがディレクトリにアクセスできるようにします: | ||
# chown ''user_name'' /srv/samba/users/demo/ | # chown ''user_name'' /srv/samba/users/demo/ | ||
# chmod 700 /srv/samba/users/demo/ | # chmod 700 /srv/samba/users/demo/ | ||
= ホームフォルダをユーザに割り当てる = | |||
== Active Directoryの場合 == | |||
=== <code>Active Directoryユーザーとコンピュータ</code>(ADUC)を使用する === | |||
Active Directoryでは、<code>Active Directoryユーザーとコンピュータ</code> Windowsアプリケーションを使用して、ユーザーのホームフォルダへのパスと割り当てられたドライブ文字を設定できます。 リモートサーバー管理ツール(RSAT)がインストールされていない場合は、[[RSATのインストール| RSATのインストール]]を参照してください。 | |||
<code>\\server\users\demo\</code>パスをホームフォルダとして<code>demo</code>アカウントに割り当てるには: | |||
* ユーザーアカウントを編集できるアカウントを使用してコンピューターにログインします。 | |||
* <code>Active Directoryユーザーとコンピュータ</code>アプリケーションを開きます。 | |||
* | * <code>demo</code>アカウントを含むディレクトリコンテナに移動します。 | ||
* | * <code>demo</code>ユーザーアカウントを右クリックして、<code>プロパティ</code>を選択します。 | ||
* | * [<code>プロフィール</code>]タブをクリックします。 | ||
* | * [<code>Connect</code>]を選択します。Windowsがマップされたホームフォルダを割り当て、<code>To</code>フィールドにホームフォルダへのパスを入力します。 | ||
:[[Image:ADUC_Set_Home_Folder.png]]. | :[[Image:ADUC_Set_Home_Folder.png]]. | ||
* | * <code>OK</code>をクリック | ||
ホームフォルダが作成されていないという設定を保存するときに警告が表示された場合: | |||
* Windowsのアクセス制御リスト(ACL)を使用して共有を設定すると、<code>users</code>共有のアクセス許可が正しく設定されませんでした。 この問題を解決するには、[[#Windows_ACLを使用する | Windows ACLの使用]]で説明されている権限を設定します。 | |||
* あなたはPOSIX ACLを使って共有を設定した。 問題を解決するには、ディレクトリを手動で作成してください。 [[#POSIX_ACLを使用する |新規ユーザーのホームフォルダーの作成 - POSIX ACLの使用]]を参照してください。 | |||
=== | === グループポリシー設定を使用する === | ||
グループポリシー設定を使用して、設定を組織単位(OU)またはドメインに割り当てることができます。これにより、たとえば、OUまたはドメイン内のすべてのユーザーにホームフォルダパスを自動的に割り当てることができます。アカウントを別のOUまたはドメインに移動すると、設定は削除または更新されます。 この方法を使用すると、各ユーザーアカウントに手動で設定を割り当てる必要はありません。 | |||
各ユーザーのホームフォルダーとして<code>\\server\users\''user_name''</code>パスを自動的に割り当てるドメインのグループポリシーオブジェクト(GPO)を作成するには、次の手順を実行します。 | |||
* | * ADドメインの<code>Administrator</code>アカウントなど、グループポリシーを編集できるアカウントを使用してコンピュータにログインします。 | ||
* | * <code>グループポリシー管理コンソール</code>を開きます。 このコンピュータにリモートサーバー管理ツール(RSAT)がインストールされていない場合は、[[RSATのインストール| RSATのインストール]]を参照してください。 | ||
* | * 自分のADドメインを右クリックして[<code>このドメインにGPOを作成し、ここにリンク</code>]を選択します。 | ||
:[[Image:GPMC_Create_GPO.png]] | :[[Image:GPMC_Create_GPO.png]] | ||
* | * <code>Home Folders on ''server''</code>のようにGPOの名前を入力します。 新しいGPOがドメインエントリの下に表示されます。 | ||
* | * 新しく作成したGPOを右クリックして[<code>編集</code>]を選択し、<code>グループポリシー管理エディタ</code>を開きます。 | ||
* | * <code>ユーザー設定</code>→に移動します。 <code>設定</code>→ <code> Windowsの設定</code>→ <code>ドライブマップ</code>エントリ | ||
* | * [<code>ドライブマップ</code>]エントリを右クリックして[<code>新規</code>]を選択し、→ <code>割り当てられたドライブ</code> | ||
* | *以下を設定してください。 | ||
:* | :* <code>General</code>タブで: | ||
::* | ::* アクション:<code>作成</code> | ||
::* | ::* 場所:<code>\\server\users\%LogonUser%</code> | ||
::: | ::: ユーザーがログインすると、Windowsは<code>%LogonUser%</code>変数を自動的に置き換えます | ||
::* | ::* <code>再接続</code>を選択 | ||
::* | ::* ラベル:文字列を入力してください。 たとえば、<code> Home </code> | ||
::* | ::* 使用:ホームフォルダが割り当てられているドライブ文字を選択します。 | ||
:* | :* <code> Common </code>タブで: | ||
::* | ::* <code>ログオンしたユーザーのセキュリティコンテキストで実行する(ユーザーポリシーオプション)</code>を選択します。 | ||
:[[Image:GPME_Home_Drive_Properties.png]] | :[[Image:GPME_Home_Drive_Properties.png]] | ||
:* | :* <code>OK</code>をクリック | ||
* | * <code>グループポリシー管理エディタ</code>を閉じます。GPOは自動的にドメインコントローラ(DC)の<code>Sysvol</code>共有に保存されます。 | ||
* <code>グループポリシー管理コンソール</code>を閉じます。 | |||
ポリシーはOUあるいはドメインのユーザーに適用され、ポリシーは次回のログオン時に割り当てられます。 | |||
=== ドメインコントローラで<code>ldbedit</code>を使用する === | |||
ドメインコントローラ(DC)上で、例えば、<code>demo</code>アカウントに対してホームフォルダーとして<code>\\server\users\demo</code>パスを割り当て、かつ割り当てたドライブレターに<code>H:</code>をセットするには: | |||
* <code>demo</code>アカウントを編集: | |||
* | |||
# ldbedit -H /usr/local/samba/private/sam.ldb 'sAMAccountName=demo' | # ldbedit -H /usr/local/samba/private/sam.ldb 'sAMAccountName=demo' | ||
* | * アカウントの属性がエディタで表示されます。以下の属性と値を一覧の最後に追加してください: | ||
homeDrive: H: | homeDrive: H: | ||
homeDirectory: \\server\users\demo\ | homeDirectory: \\server\users\demo\ | ||
* | * 変更を保存します。 | ||
設定は、次回そのユーザーがログインする際に適用されます。 | |||
== NT4ドメインで == | |||
NT4ドメインで、ホームフォルダーのパスとして<code>\\server\users\%U</code>をセットし、ドライブレターが<code>H:</code>のドライブにマップするには: | |||
* 以下のパラメータを<conf>smb.conf</conf>ファイルの<code>[global]</code>セクションに追加します: | |||
logon drive = H: | logon drive = H: | ||
logon home = \\server\users\%U | logon home = \\server\users\%U | ||
: | : ドメインメンバーがログインする際に、Sambaは変数<code>%U</code>をセッションユーザ名で自動的に置き換えます。詳細については、<code>smb.conf(5)</code>のマニュアルページの<code>Variable Substitutions</code>セクションを参照してください。 | ||
* | * Sambaをリロード: | ||
# smbcontrol all reload-config | # smbcontrol all reload-config | ||
== 非ドメイン環境 == | |||
=== Windows Professional あるいは上位のエディション === | |||
Sambaサーバとクライアントがドメインの一部でない場合、ローカルユーザーアカウントのプロパティにユーザーホームフォルダーのマッピングを設定してください: | |||
* ローカルの<code>Administrators</code>グループに属しているアカウントを使用して、Windowsマシンにログオンしてください。 | |||
* | * <code>lusrmgr.msc</code>(ローカルユーザーとグループ)を開いてください。 | ||
: Windows Home editionでは、<code>lusrmgr.msc</code>は利用できません。 | |||
* | * 左側のナビゲーションで、<code>ユーザー</code>をクリックします。 | ||
* | * ホームフォルダーを割り当てたいアカウントを右クリックし、<code>プロパティ</code>を選択します。 | ||
* | * <code>プロファイル</code>タブに移動します。 | ||
* | * <code>接続ドライブ</code>を選択し、マップされたホームフォルダにドライブレターを割り当て、<code>パス</code>フィールドにホームフォルダのパスを入力してください。 | ||
* | * <code>OK</code>をクリックします。 | ||
全てのWindowsクライアントのそれぞれのユーザーに手動でマッピングを設定する必要があります。 | |||
=== | === Windows Home Editionを使用 === | ||
Windows | Windows Homeエディションは、ローカルアカウントのプロパティでユーザーのホームフォルダーのマッピングを設定するために必要なアプリケーションを提供しません。 代わりに、各ユーザーが手動でドライブを割り当てる必要があります: | ||
* | *ホームフォルダをマッピングする必要があるユーザーとしてWindowsマシンにログオンします。 | ||
* | *コマンドプロンプトを開きます。 | ||
* | *たとえば、<code>\\server\users\demo\</code>フォルダを<code>H:</code>ドライブ文字にマップするには、次のように入力します。 | ||
> net use H: \\server\users\demo\ /persistent:yes | > net use H: \\server\users\demo\ /persistent:yes | ||
ユーザーがログインすると、ユーザーのホームフォルダが自動的に接続されます。自動マッピングを停止するには、ドライブを取り外します。 例えば: | |||
> net use H: /delete | > net use H: /delete | ||
2019年3月3日 (日) 01:07時点における最新版
はじめに
ホームフォルダには、個々のアカウントのファイルが含まれています。Sambaを使用すると、ネットワークユーザーが自分のファイルを、ファイルサーバー上の自分のホームフォルダーに保存できるように、ディレクトリを共有できます。
このドキュメントでは、\\server\user_name\パスを使用して、ユーザーのホームディレクトリを動的に共有する、Sambaのビルトインの[homes]セクションを使用しません。これは特定のシナリオでは役に立ちますが、いくつかの欠点があります。
- Windowsはこの機能をサポートしていません。また、Active Directory(AD)でのフォルダリダイレクトなどの特定の設定では代わりに回避策が必要になり、公式のソリューションを使用できません。
- 新しい各ユーザーのホームディレクトリを手動で作成する必要があります。
[homes]はActive Directory (AD) ドメインコントローラ(DC)上での実行はサポートされていません。
以下では、ホームフォルダを含んでいるディレクトリは、共有名usersを使用して共有されます。各ユーザーのホームディレクトリは、\\server\users\user_nameのような感じで、\\server\users\共有のサブディレクトリとして作成されます。これはMicrosoft Windowsの環境で使われているのと同じフォーマットであり、追加の設定を要しません。
Sambaファイルサーバーで共有を設定する
WindowsのACLを使う
ホームディレクトリをホストする共有に、拡張アクセスコントロールリスト(ACL)を設定することは、手動でユーザーのホームフォルダを作成、アクセス許可を設定することなしに、Active Directory ユーザーとコンピュータに新しいユーザーを作成することを可能にします。
Sambaファイルサーバー上でユーザーのホームフォルダーをホストするための共有を作成するには、たとえばusersを使用します:
- 新しい共有を作成してください。 詳細については、Windows ACLs を利用して共有を設定するを参照してください。 以下の権限を設定します:
- 共有の権限:
Principal Access Domain Users Change Domain Admins Full Control
users共有のルートのファイルシステムのアクセス許可:
Principal Access Applies to Domain Users* Read & execute This folder only CREATOR OWNER Full control Subfolders and files only Domain Admins Full control This folder, subfolders and files
- * グループのメンバーがユーザーのプロファイルをその共有に格納することを可能にするために、別のグループを設定することもできます。異なるグループを使用する場合は、前の例の
Domain Usersに表示されているように権限を適用してください。
- * グループのメンバーがユーザーのプロファイルをその共有に格納することを可能にするために、別のグループを設定することもできます。異なるグループを使用する場合は、前の例の
- 共有のルートで権限の継承が無効になっていることを確認します。[
セキュリティの詳細設定]ウィンドウの許可エントリに継承元列にパスが表示されている場合は、[継承を無効にする]ボタンをクリックします。 Windows 7では、このオブジェクトの親からの継承可能なアクセス許可を含めるチェックボックスをオフにして、同じ設定を設定します。
- 共有のルートで権限の継承が無効になっていることを確認します。[

- Samba共有では、ファイルシステムACLの
SYSTEMアカウントを省略できます。詳細は、The SYSTEM Accountを参照してください。
- Samba共有では、ファイルシステムACLの
これらの設定により、Domain Adminsグループのメンバーは、Active Directoryユーザーとコンピュータアプリケーションでユーザーのホームフォルダを設定できます。これにより、ホームフォルダが自動的に作成され、正しいアクセス許可が設定されます。
POSIX ACLを使用する
Windowsのアクセス制御リスト(ACL)を使用する代わりに、SambaサーバーでPOSIX ACLを使用して共有を設定できます。 ただし、POSIX ACLを使用して権限を設定する場合は、新しいユーザーごとにホームディレクトリを手動で作成し、権限を設定する必要があります。
{{#invoke:Message box|imbox}}
たとえば、users共有を作成するには:
smb.confファイルに次の共有設定セクションを追加します:
 [users]
         path = /srv/samba/users/
         read only = no
         force create mode = 0600
         force directory mode = 0700
- 使用されるパラメータの詳細については、smb.conf(5) のマニュアルページの説明を参照してください。
- 共有の名前として
homesを使用しないでください。 詳細については、 はじめにを参照してください。
- ディレクトリを作成し、正しい権限を設定してください:
# mkdir -p /srv/samba/users/
# chgrp -R "Domain Users" /srv/samba/users/
# chmod 2750 /srv/samba/users/
- ドメインでは、
Domain Usersグループはグループで、すべてのドメインユーザーアカウントがそのメンバーです。 あるいは、ドメイン以外の環境を実行している場合は、ローカルに存在する任意のグループに設定できます。 ただし、共有にアクセスするには、ユーザーアカウントがこのグループのメンバーである必要があります。
- Sambaをリロード:
# smbcontrol all reload-config
新しいユーザのホームフォルダを作成する
Windows ACLを使用する
Active Directoryユーザーとコンピュータアプリケーションを使用している場合は、ユーザーのホームディレクトリが自動的に作成され、アプリケーションでユーザーフォルダへのパスを設定すると正しいアクセス許可が適用されます。 Active Directoryユーザーとコンピュータを使用していない場合は、フォルダを手動で作成して正しい権限を設定する必要があります。 例えば;
\\server\users\共有に新しいフォルダを作成する権限を持つアカウントを使用してWindowsマシンにログインします。
\\server\users\共有に移動します。
- ユーザーの新しいホームフォルダを作成します。
- フォルダのアクセス制御リスト(ACL)にユーザを追加し、そのユーザに
フルコントロールを付与します。 詳細については、フォルダへのACLの設定を参照してください。
POSIX ACLを使用する
POSIXアクセスコントロールリスト(ACL)を使用してusers共有を設定するときは、新しいユーザーごとにホームフォルダを手動で作成する必要があります。 demoユーザーのホームフォルダを作成するには:
- ディレクトリを作成:
# mkdir /srv/samba/users/demo/
- 次の権限を設定して、
demoユーザーのみがディレクトリにアクセスできるようにします:
# chown user_name /srv/samba/users/demo/
# chmod 700 /srv/samba/users/demo/
ホームフォルダをユーザに割り当てる
Active Directoryの場合
Active Directoryユーザーとコンピュータ(ADUC)を使用する
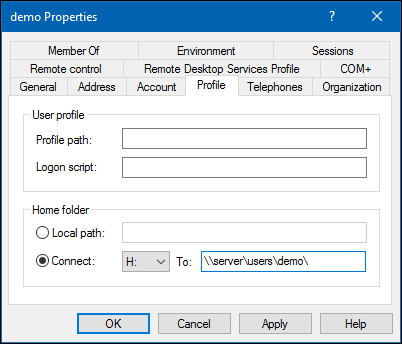
Active Directoryでは、Active Directoryユーザーとコンピュータ Windowsアプリケーションを使用して、ユーザーのホームフォルダへのパスと割り当てられたドライブ文字を設定できます。 リモートサーバー管理ツール(RSAT)がインストールされていない場合は、 RSATのインストールを参照してください。
\\server\users\demo\パスをホームフォルダとしてdemoアカウントに割り当てるには:
- ユーザーアカウントを編集できるアカウントを使用してコンピューターにログインします。
Active Directoryユーザーとコンピュータアプリケーションを開きます。
demoアカウントを含むディレクトリコンテナに移動します。
demoユーザーアカウントを右クリックして、プロパティを選択します。
- [
プロフィール]タブをクリックします。
- [
Connect]を選択します。Windowsがマップされたホームフォルダを割り当て、Toフィールドにホームフォルダへのパスを入力します。
 .
.

OKをクリック
ホームフォルダが作成されていないという設定を保存するときに警告が表示された場合:
- Windowsのアクセス制御リスト(ACL)を使用して共有を設定すると、
users共有のアクセス許可が正しく設定されませんでした。 この問題を解決するには、 Windows ACLの使用で説明されている権限を設定します。 - あなたはPOSIX ACLを使って共有を設定した。 問題を解決するには、ディレクトリを手動で作成してください。 新規ユーザーのホームフォルダーの作成 - POSIX ACLの使用を参照してください。
グループポリシー設定を使用する
グループポリシー設定を使用して、設定を組織単位(OU)またはドメインに割り当てることができます。これにより、たとえば、OUまたはドメイン内のすべてのユーザーにホームフォルダパスを自動的に割り当てることができます。アカウントを別のOUまたはドメインに移動すると、設定は削除または更新されます。 この方法を使用すると、各ユーザーアカウントに手動で設定を割り当てる必要はありません。
各ユーザーのホームフォルダーとして\\server\users\user_nameパスを自動的に割り当てるドメインのグループポリシーオブジェクト(GPO)を作成するには、次の手順を実行します。
- ADドメインの
Administratorアカウントなど、グループポリシーを編集できるアカウントを使用してコンピュータにログインします。
グループポリシー管理コンソールを開きます。 このコンピュータにリモートサーバー管理ツール(RSAT)がインストールされていない場合は、 RSATのインストールを参照してください。
- 自分のADドメインを右クリックして[
このドメインにGPOを作成し、ここにリンク]を選択します。

Home Folders on serverのようにGPOの名前を入力します。 新しいGPOがドメインエントリの下に表示されます。
- 新しく作成したGPOを右クリックして[
編集]を選択し、グループポリシー管理エディタを開きます。
ユーザー設定→に移動します。設定→Windowsの設定→ドライブマップエントリ
- [
ドライブマップ]エントリを右クリックして[新規]を選択し、→割り当てられたドライブ
- 以下を設定してください。
Generalタブで:
- アクション:
作成 - 場所:
\\server\users\%LogonUser%
- ユーザーがログインすると、Windowsは
%LogonUser%変数を自動的に置き換えます
再接続を選択- ラベル:文字列を入力してください。 たとえば、
Home - 使用:ホームフォルダが割り当てられているドライブ文字を選択します。
- アクション:
Commonタブで:
ログオンしたユーザーのセキュリティコンテキストで実行する(ユーザーポリシーオプション)を選択します。

OKをクリック
グループポリシー管理エディタを閉じます。GPOは自動的にドメインコントローラ(DC)のSysvol共有に保存されます。
グループポリシー管理コンソールを閉じます。
ポリシーはOUあるいはドメインのユーザーに適用され、ポリシーは次回のログオン時に割り当てられます。
ドメインコントローラでldbeditを使用する
ドメインコントローラ(DC)上で、例えば、demoアカウントに対してホームフォルダーとして\\server\users\demoパスを割り当て、かつ割り当てたドライブレターにH:をセットするには:
demoアカウントを編集:
# ldbedit -H /usr/local/samba/private/sam.ldb 'sAMAccountName=demo'
- アカウントの属性がエディタで表示されます。以下の属性と値を一覧の最後に追加してください:
homeDrive: H:
homeDirectory: \\server\users\demo\
- 変更を保存します。
設定は、次回そのユーザーがログインする際に適用されます。
NT4ドメインで
NT4ドメインで、ホームフォルダーのパスとして\\server\users\%Uをセットし、ドライブレターがH:のドライブにマップするには:
- 以下のパラメータを<conf>smb.conf</conf>ファイルの
[global]セクションに追加します:
logon drive = H:
logon home = \\server\users\%U
- ドメインメンバーがログインする際に、Sambaは変数
%Uをセッションユーザ名で自動的に置き換えます。詳細については、smb.conf(5)のマニュアルページのVariable Substitutionsセクションを参照してください。
- Sambaをリロード:
# smbcontrol all reload-config
非ドメイン環境
Windows Professional あるいは上位のエディション
Sambaサーバとクライアントがドメインの一部でない場合、ローカルユーザーアカウントのプロパティにユーザーホームフォルダーのマッピングを設定してください:
- ローカルの
Administratorsグループに属しているアカウントを使用して、Windowsマシンにログオンしてください。
lusrmgr.msc(ローカルユーザーとグループ)を開いてください。
- Windows Home editionでは、
lusrmgr.mscは利用できません。
- 左側のナビゲーションで、
ユーザーをクリックします。
- ホームフォルダーを割り当てたいアカウントを右クリックし、
プロパティを選択します。
プロファイルタブに移動します。
接続ドライブを選択し、マップされたホームフォルダにドライブレターを割り当て、パスフィールドにホームフォルダのパスを入力してください。
OKをクリックします。
全てのWindowsクライアントのそれぞれのユーザーに手動でマッピングを設定する必要があります。
Windows Home Editionを使用
Windows Homeエディションは、ローカルアカウントのプロパティでユーザーのホームフォルダーのマッピングを設定するために必要なアプリケーションを提供しません。 代わりに、各ユーザーが手動でドライブを割り当てる必要があります:
- ホームフォルダをマッピングする必要があるユーザーとしてWindowsマシンにログオンします。
- コマンドプロンプトを開きます。
- たとえば、
\\server\users\demo\フォルダをH:ドライブ文字にマップするには、次のように入力します。
> net use H: \\server\users\demo\ /persistent:yes
ユーザーがログインすると、ユーザーのホームフォルダが自動的に接続されます。自動マッピングを停止するには、ドライブを取り外します。 例えば:
> net use H: /delete