ユーザーホームフォルダ
はじめに
ホームフォルダには、個々のアカウントのファイルが含まれています。Sambaを使用すると、ネットワークユーザーが自分のファイルを、ファイルサーバー上の自分のホームフォルダーに保存できるように、ディレクトリを共有できます。
このドキュメントでは、\\server\user_name\パスを使用して、ユーザーのホームディレクトリを動的に共有する、Sambaのビルトインの[homes]セクションを使用しません。これは特定のシナリオでは役に立ちますが、いくつかの欠点があります。
- Windowsはこの機能をサポートしていません。また、Active Directory(AD)でのフォルダリダイレクトなどの特定の設定では代わりに回避策が必要になり、公式のソリューションを使用できません。
- 新しい各ユーザーのホームディレクトリを手動で作成する必要があります。
[homes]はActive Directory (AD) ドメインコントローラ(DC)上での実行はサポートされていません。
以下では、ホームフォルダを含んでいるディレクトリは、共有名usersを使用して共有されます。各ユーザーのホームディレクトリは、\\server\users\user_nameのような感じで、\\server\users\共有のサブディレクトリとして作成されます。これはMicrosoft Windowsの環境で使われているのと同じフォーマットであり、追加の設定を要しません。
Sambaファイルサーバーで共有を設定する
WindowsのACLを使う
ホームディレクトリをホストする共有に、拡張アクセスコントロールリスト(ACL)を設定することは、手動でユーザーのホームフォルダを作成、アクセス許可を設定することなしに、Active Directory ユーザーとコンピュータに新しいユーザーを作成することを可能にします。
Sambaファイルサーバー上でユーザーのホームフォルダーをホストするための共有を作成するには、たとえばusersを使用します:
- 新しい共有を作成してください。 詳細については、Windows ACLs を利用して共有を設定するを参照してください。 以下の権限を設定します:
- 共有の権限:
Principal Access Domain Users Change Domain Admins Full Control
users共有のルートのファイルシステムのアクセス許可:
Principal Access Applies to Domain Users* Read & execute This folder only CREATOR OWNER Full control Subfolders and files only Domain Admins Full control This folder, subfolders and files
- * グループのメンバーがユーザーのプロファイルをその共有に格納することを可能にするために、別のグループを設定することもできます。異なるグループを使用する場合は、前の例の
Domain Usersに表示されているように権限を適用してください。
- * グループのメンバーがユーザーのプロファイルをその共有に格納することを可能にするために、別のグループを設定することもできます。異なるグループを使用する場合は、前の例の
- 共有のルートで権限の継承が無効になっていることを確認します。[
セキュリティの詳細設定]ウィンドウの許可エントリに継承元列にパスが表示されている場合は、[継承を無効にする]ボタンをクリックします。 Windows 7では、このオブジェクトの親からの継承可能なアクセス許可を含めるチェックボックスをオフにして、同じ設定を設定します。
- 共有のルートで権限の継承が無効になっていることを確認します。[

- Samba共有では、ファイルシステムACLの
SYSTEMアカウントを省略できます。詳細は、The SYSTEM Accountを参照してください。
- Samba共有では、ファイルシステムACLの
これらの設定により、Domain Adminsグループのメンバーは、Active Directoryユーザーとコンピュータアプリケーションでユーザーのホームフォルダを設定できます。これにより、ホームフォルダが自動的に作成され、正しいアクセス許可が設定されます。
POSIX ACLを使用する
Windowsのアクセス制御リスト(ACL)を使用する代わりに、SambaサーバーでPOSIX ACLを使用して共有を設定できます。 ただし、POSIX ACLを使用して権限を設定する場合は、新しいユーザーごとにホームディレクトリを手動で作成し、権限を設定する必要があります。
{{#invoke:Message box|imbox}}
たとえば、users共有を作成するには:
smb.confファイルに次の共有設定セクションを追加します:
 [users]
         path = /srv/samba/users/
         read only = no
         force create mode = 0600
         force directory mode = 0700
- 使用されるパラメータの詳細については、smb.conf(5) のマニュアルページの説明を参照してください。
- 共有の名前として
homesを使用しないでください。 詳細については、 はじめにを参照してください。
- Create the directory and set the correct permissions:
# mkdir -p /srv/samba/users/
# chgrp -R "Domain Users" /srv/samba/users/
# chmod 2750 /srv/samba/users/
- ドメインでは、
Domain Usersグループはグループで、すべてのドメインユーザーアカウントがそのメンバーです。 あるいは、ドメイン以外の環境を実行している場合は、ローカルに存在する任意のグループに設定できます。 ただし、共有にアクセスするには、ユーザーアカウントがこのグループのメンバーである必要があります。
- Sambaをリロード:
# smbcontrol all reload-config
新しいユーザのホームフォルダを作成する
Windows ACLを使用する
Active Directoryユーザーとコンピュータアプリケーションを使用している場合は、ユーザーのホームディレクトリが自動的に作成され、アプリケーションでユーザーフォルダへのパスを設定すると正しいアクセス許可が適用されます。 Active Directoryユーザーとコンピュータを使用していない場合は、フォルダを手動で作成して正しい権限を設定する必要があります。 例えば;
- Log in to a Windows machine using an account that has permissions to create new folders on the
\\server\users\share.
- Navigate to the
\\server\users\share.
- Create a new home folder for the user.
- Add the user to the access control list (ACL) of the folder and grant
Full controlto the user. For details, see Setting ACLs on a Folder.
Using POSIX ACLs
When you set up the users share using POSIX access control lists (ACL), you must create the home folder for each new user manually. To create the home folder for the demo user:
- Create the directory:
# mkdir /srv/samba/users/demo/
- Set the following permissions to only enable the
demouser to access the directory:
# chown user_name /srv/samba/users/demo/
# chmod 700 /srv/samba/users/demo/
Assigning a Home Folder to a User
In an Active Directory
Using Active Directory Users and Computers
In an Active Directory, you can use the Active Directory Users and Computers Windows application to set the path to the user home folder and the assigned drive letter. If you do not have the Remote Server Administration Tools (RSAT) installed, see Installing RSAT.
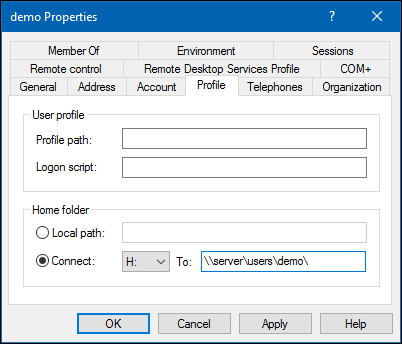
To assign the \\server\users\demo\ path as home folder to the demo account:
- Log in to a computer using an account that is able to edit user accounts.
- Open the
Active Directory Users and Computersapplication.
- Navigate to the directory container that contains the
demoaccount.
- Right-click to the
demouser account and selectProperties.
- Select the
Profiletab.
- Select
Connect, the drive letter Windows assigns the mapped home folder to, and enter the path to the home folder into theTofield.
 .
.

- Click
OK.
If a warning is displayed when saving the settings that the home folder was not created:
- the permissions on the
usersshare were incorrectly set when you set up the share using Windows access control lists (ACL). To fix the problem, set the permissions described in Using Windows ACLs. - you set up the share using POSIX ACL. To fix the problem, create the directory manually. See Creating the Home Folder for a New User - Using POSIX ACLs.
Using a Group Policy Preference
Using group policy preferences, you can assign settings to organizational units (OU) or to a domain. This enables you, for example, to automatically assign home folder paths to all users in the OU or domain. If you move the account to a different OU or domain, the setting is removed or updated. Using this way, you do not have to assign manually the setting to each user account.
To create a group policy object (GPO) for the domain that automatically assigns the \\server\users\user_name path as home folder to each user:
- Log in to a computer using an account that is allowed you to edit group policies, such as the AD domain
Administratoraccount.
- Open the
Group Policy Management Console. If you are not having the Remote Server Administration Tools (RSAT) installed on this computer, see Installing RSAT.
- Right-click to your AD domain and select
Create a GPO in this domain, and Link it here.

- Enter a name for the GPO, such as
Home folders on server. The new GPO is shown below the domain entry.
- Right-click to the newly-created GPO and select
Editto open theGroup Policy Management Editor.
- Navigate to the
User Configuration→Preferences→Windows Settings→Drive Mapsentry.
- Right-click to the
Drive Mapsentry and selectNew→Mapped Drive.
- Set the following:
- On the
Generaltab:
- Action:
Create - Location:
\\server\users\%LogonUser%
- Windows automatically replaces the
%LogonUser%variable when a user logs in
- Select
Reconnect - Label: Enter a string. For example:
Home - Use: Select a drive letter the home folder is mapped to.
- Action:
- On the
Commontab:
- Select
Run in logged-on user's security context (user policy option)
- Select
- On the

- Click
OK.
- Click
- Close the
Group Policy Management Editor. The GPOs are automatically saved on theSysvolshare on the domain controller (DC).
- Close the
Group Policy Management Console.
The policy is applied to users in the OU or domain, the policy is assigned to, during the next log in.
Using ldbedit on a Domain Controller
On a domain controller (DC), for example, to assign the \\server\users\demo path as home folder to the demo account and set the assigned drive letter to H:
- Edit the
demouser account:
# ldbedit -H /usr/local/samba/private/sam.ldb 'sAMAccountName=demo'
- The accounts attributes are displayed in an editor. Append the following attributes and values to the end of the list:
homeDrive: H:
homeDirectory: \\server\users\demo\
- Save the changes.
The setting is applied the next time the user logs in.
In an NT4 Domain
In an Samba NT4 domain, to set \\server\users\%U as path to the home folder and to map the drive to the H: drive letter:
- Add the following parameters to the
[global]section in yoursmb.conffile:
logon drive = H:
logon home = \\server\users\%U
- During logging in to the domain member, Samba automatically replaces the
%Uvariable with the session user name. For further details, see theVariable Substitutionssection in thesmb.conf(5)man page.
- Reload Samba:
# smbcontrol all reload-config
In a Non-domain Environment
Using a Windows Professional or Higher Edition
If your Samba server and clients are not part of a domain, set the user home folder mapping in the local user account's properties:
- Log on to the Windows machine using an account that is member of the local
Administratorsgroup.
- Open the
lusrmgr.msc(Local User and Groups) application.
- The
lusrmgr.mscapplication is not available in Windows Home editions.
- Click
Usersin the navigation on the left side.
- Right-click the account you want to assign a home folder to, and select
Properties
- Navigate to the
Profiletab.
- Select
Connect, the drive letter Windows assigns the mapped home folder to, and enter the path to the home folder into theTofield.
- Click
OK.
You must set the mapping for each user on every Windows client manually.
Using Windows Home Edition
Windows Home editions do not provide the necessary application to set the user home folder mapping in the local account properties. Instead each user must map the drive manually:
- Log on to the Windows machine as the user that should get the home folder mapped
- Open a command prompt.
- For example, to map the
\\server\users\demo\folder to theH:drive letter, enter:
> net use H: \\server\users\demo\ /persistent:yes
The user home folder is automatically connected when the user logs in. To stop the automatic mapping, disconnect the drive. For example:
> net use H: /delete